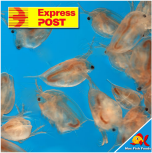
1. Daphnia - Live Aquarium Foods

    Grow your baby fish like a PRO
    Live Daphnia are great live feed for your Fish or Shrimp Fry. Order online to start a never-ending supply of Live Daphnia! [ Click to order ]
    Dismiss Notice
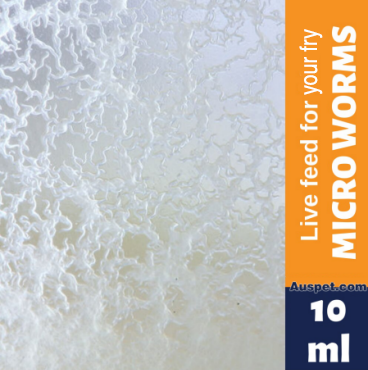
  2. Microworms - Live Aquarium Foods

    Grow your baby fish like a PRO
    Microworms are a great live feed for your Fish or Shrimp Fry, easy to culture and considerably improve your fry mortality rate. Start your never-ending supply of Microworms today! [ Click to order ]
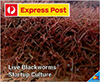
  3. Australian Blackworms - Live Fish Food

    Grow your baby fish like a PRO
    Live Australian Blackworms, Live Vinegar Eels. Visit us now to order online. Express Delivery. [ Click to order ]
    Dismiss Notice

Low Cost DIY 75 gallon canopy

Discussion in 'Fish and Aquarium - all types' started by t_chelle16, Mar 21, 2005.

  1. t_chelle16

    t_chelle16 New Member

    I'm not done with the project yet so this is just a teaser.

    We're currently remodeling the house and I have all kinds of scrap wood, trim, and what not laying around so I decided to use it to build a canopy for the 75 gallon. My goal is to be able to build it for less than $30. (Remember, we're in the middle of remodeling so ignore the mess).

    Most of the wood is MDF from my brother's old waterbed. I started by cutting the front & side pieces and beveling the ends where the front corners will be.
    [​IMG]

    I cut 2 small pieces of ferring strip and glued/nailed them so that they are flush with the top and the bottoms are both the same distance (the width of the top tank trim) from the bottom of the boards. These will act as both corner reinforcements and supports for the canopy.
    [​IMG]

    I attached the 2 end pieces to the front by gluing the ends and nailing into the corner support.
    [​IMG]

    I added a long piece of ferring strip across the back for support. I didn't make the back go all the way down because I need space for ventillation and for the filter hoses. The tank is currently acting as a room divider but will eventually be moved so it's up against a wall and you won't see the back of the canopy. I also added 3 more pieces of ferring strips which will help support the canopy (again, the distance between them and the bottom of the sides is the same as the tank trim). Everything is held with glue & nails. This thing is very solid and you'd need a hammer to get it apart.
    [​IMG]

    Then I cut a large piece for the back half of the top. This is a permanantly fixed piece and the light will be underneath it.
    [​IMG]

    Underside
    [​IMG]


    The front will have 2 doors that lift up. I added a brace in the middle that will help support the doors when they're closed.
    [​IMG]

    It fits! :D I ran out of the MDF (had a couple pieces lacking 2" from being big enough :mad: ) so I just used some plywood for the doors.
    [​IMG]

    Next, I filled in all the nail holes with wood filler and put on a coat of primer. Then I painted the inside gloss white:
    [​IMG]

    And painted the outside semi-gloss black:
    [​IMG]

    All I have left to do is stain some trim, put it on, and I may replace the standard light strip with a 48" shop light so I can have 2 bulbs instead of just the one.


    Cost:

    MDF & plywood - $0
    Ferring strips - $0
    Stain - $0
    Sandpaper, nails, glue, etc - $0
    1 gallon mis-tint black paint - $6 (regular price was $22. I only used less than a quart, but it was a good deal and I'll need it for the stand as well. The mis-tint section can be your best friend :y_the_best: )
    1 can gloss white high heat paint - $4 (I actually bought this for another project but used most of it on the canopy so I'll count it)
    2 8' trim pieces - approx $3 (I haven't bought them yet. I do have some trim already, but not enough)
    4 hinges - $6
    shop light - $9 (I may not get this)

    Estimated total cost: $28

    After this I'm going to give the stand a face lift and I might build a canopy for my 20 gallon using the shelves from our old kitchen cabinets.

    -Chelle
     
  2. drab911

    drab911 New Member

    Are you going to have some sort of glass on the inside to stop the water from damaging the wood and lights etc? You did a beautiful job on it very impressed! Gave me confidence knowing wood is a good material to use!!
     
  3. M_wm

    M_wm New Member

    Looks awesome cant wait to see it done
     
  4. Fish Addict

    Fish Addict New Member

    cool look the same as mine only bigger
     
  5. t_chelle16

    t_chelle16 New Member

    Thanks.

    Underneath it will be the standard glass lid. I made the lids on the canopy large enough that I can open them then open the glass lid underneath.

    -Chelle
     
  6. t_chelle16

    t_chelle16 New Member

    I got the hinges and trim (found plenty so I didn't need to buy any) on so it's pretty much done. I just have to do some minor touch ups like painting the screw heads for the hinges and staining the ends of the trim where I cut it. I might also polyurethane the trim to make it a little glossy, but I haven't decided yet. The spacing around the doors is a little uneven, but I don't think it's too bad considering this is my first major woodworking project and I was using scraps. And unfortunately, the tank is too close to the wall so now that I've added the trim I can't put the canopy on until we move the tank.

    [​IMG]


    [​IMG]

    Total cost - $16
    Wood (plywood, MDF, ferring strips, trim, etc) - $0
    Primer - $0
    Nails, glue, sandpaper - $0
    Stain - $0
    1 gallon black paint - $6
    4 hinges - $6
    1 can gloss white high heat paint - $4

    I've decided to just stick with my original strip light for now. I still might switch to a double bulb shop light but it's really not all that important right now.

    -Chelle
     
  7. tski22

    tski22 New Member

    Wow Chelle looks geat! What kind of lighting is going to be under the hood? Just wondering iof you use anything special because if I remember right that isnt a plantyed tank. Just asking out of curiosity. -tl
     
  8. t_chelle16

    t_chelle16 New Member

    Actually, it's my african cichlid tank so there's no plants. The tank has a black 3D background with brown algae on it and a mix of black and brown gravel. That's why I went with black with wood trim for the canopy. It matches the tank really well. For now I'm just going to stick with the standard 4' light strip that I already have. Then if I happen to come across a really cheap shop light that holds two bulbs I might get that because I'd like to have one regular bulb and one 50/50 to bring out their colors.

    We're actually getting ready to drain and move the tank today and I can start redoing the stand (to match the canopy). So I should at least be able to get a pic of the tank with the canopy tonight and then the whole thing in a few days when I finish the stand.

    -Chelle
     
  9. t_chelle16

    t_chelle16 New Member

    I got the tank moved today so I can put the canopy on (I had to remove part of the 3D background so I can re-do it. And the soda bottles are only there because I added several juveniles and they need places to hide that the bigger fish can't get into).

    [​IMG]

    My next project is to give the stand a face lift. The original doors had a brace between them which made it very difficult to get the canister out for cleaning. The back of the tank, however, was completely open with just some thin hardboard (not structural). When I moved the tank, I turned the stand around and I'm going to make a new front on what was the back. While I had the tank off the stand, I nailed some board in place for the ends and now I just have to put the doors on, do some touchups, paint it and put the trim on.

    -Chelle
     

Share This Page